How to Make a Bracelet with String DIY: Your Ultimate Guide to Knotting Magic
There’s a special kind of magic in creating something beautiful with your own hands. String bracelets, whether simple strands or intricate friendship patterns, hold a timeless appeal. They’re symbols of connection, personal expression, and the simple joy of crafting. Forget expensive materials or complicated tools; the beauty of DIY string bracelets lies in their accessibility. With just a few basic supplies and a willingness to learn some simple knots, you can unlock a world of colourful creativity right at your fingertips.
This guide is designed to walk you through everything you need to know, from gathering your supplies and choosing the right string to mastering basic knots and creating your very first bracelets. Whether you’re looking for a relaxing hobby, a way to make personalized gifts, or simply want to adorn your wrist with unique creations, let’s dive into the wonderful world of DIY string bracelets!
Why Dive into DIY String Bracelets?
Beyond just being a fun way to pass the time, making your own string bracelets offers a surprising number of benefits:
- Unleash Your Creativity: This is your chance to play with colour, texture, and pattern. Mix and match strings, add beads or charms, and design pieces that are uniquely you. There are endless possibilities, from simple braids to complex geometric designs.
- Mindful Crafting: The repetitive motion of knotting can be incredibly meditative and calming. It’s a wonderful way to unplug from screens, focus your mind, and de-stress after a busy day.
- Personalized Gifts: A handmade bracelet is a thoughtful and heartfelt gift. You can tailor the colours and style to suit the recipient’s personality, making it a truly special token of friendship or affection.
- Budget-Friendly Hobby: Compared to many other crafts, string bracelet making is very inexpensive. Embroidery floss and basic cords are readily available and affordable, meaning you can create many beautiful pieces without breaking the bank.
- Skill Building: Learning different knots and patterns builds dexterity and patience. Starting with simple designs and gradually tackling more complex ones provides a satisfying sense of accomplishment.
- Portable Project: Once you have your strings cut and secured (often with just a safety pin to your jeans!), you can take your bracelet project almost anywhere – perfect for road trips, waiting rooms, or relaxing outdoors.
Gathering Your Essential Toolkit
One of the best things about making string bracelets is how few supplies you actually need to get started. Here’s a rundown of the basics:
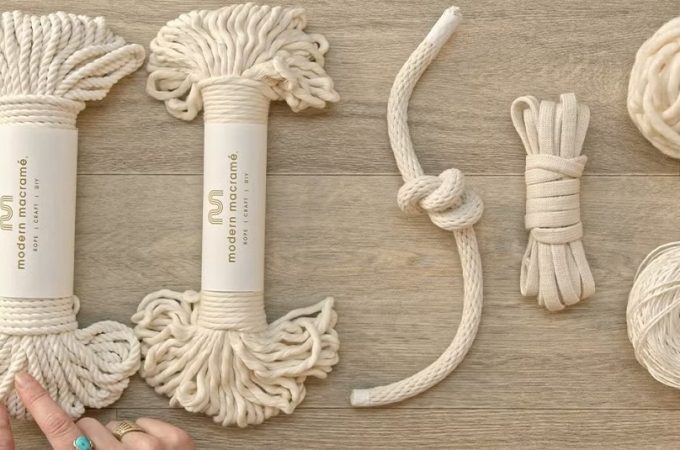
- String/Cord: This is your main material! The type you choose will affect the look and feel of your bracelet. We’ll delve deeper into specific types below, but popular choices include embroidery floss, waxed cotton cord, hemp, and nylon cord.
- Scissors: A sharp pair of scissors is crucial for clean cuts. Craft scissors or even nail scissors will work perfectly.
- Measuring Tool: A ruler or measuring tape is needed to cut your strings to the correct length. Different patterns require different lengths.
- Securing Method: You need a way to hold your strings taut while you work. Common methods include:
- Tape: Simply tape the knotted end of your strings to a table or flat surface.
- Clipboard: Clip the knotted end under the clipboard’s clamp. This is easily portable.
- Safety Pin: Pin the knotted end to your jeans (on the knee is popular) or a cushion.
- Optional Embellishments:
- Beads/Charms: Add personality by incorporating beads or small charms. Ensure the hole is large enough for your chosen string.
- Buttons: Can be used as a clasp for certain bracelet styles.
- Optional Finishing Supplies:
- Craft Glue/Clear Nail Polish: A tiny dab can help secure final knots, especially on slippery cords or elastic.
- Crimp Beads/Covers & Pliers: Used for a more professional finish, especially with beading wire or to create neat ends on adjustable closures.
Choosing the Perfect String: Material Matters
The string you select is fundamental to your bracelet’s final look, feel, and durability. Here’s a look at some common options:
- Embroidery Floss: The classic choice for traditional friendship bracelets. It comes in a vast array of colours, is inexpensive, and typically consists of six strands that can be separated for finer work or used together for standard thickness. It’s soft and comfortable to wear.
- Waxed Cotton or Polyester Cord: These cords are coated with wax, giving them durability, water resistance, and a slight stiffness that holds knots well. They are excellent for macrame techniques (like square knots) and create sturdy bracelets. Available in various thicknesses.
- Hemp Cord: Offers a natural, slightly rustic, or bohemian look. It’s strong and great for knotting and braiding, often used for macrame. It can be a bit coarser than cotton.
- Nylon Cord (e.g., Chinese Knotting Cord): Smooth, often silky with a nice drape, and very durable. It’s excellent for intricate knotwork like Shamballa bracelets or Kumihimo braiding. The ends can often be melted carefully with a lighter to prevent fraying (adult supervision required).
- Elastic Cord: Specifically designed for stretchy bracelets, especially beaded ones. It comes in various types (single rubbery strand, multi-strand floss, fabric-covered) and thicknesses. Choose a size that fits your bead holes and knot carefully (surgeon’s knot often recommended, sometimes with glue).
- Leather or Suede Cord: Provides a different aesthetic, often used for simpler designs, wrap bracelets, or with larger beads. Available in round or flat profiles. Faux versions offer a similar look.
- Yarn: Thicker yarn can be used for chunkier, softer bracelets. It works up quickly but may not be as durable as other options for daily wear. Omegacryl is a yarn type sometimes recommended for bracelet making due to its colours and strength.
Tip: When starting, embroidery floss is very forgiving and great for practicing basic friendship bracelet patterns. Waxed cord is ideal for learning square knots and making adjustable bracelets.
Mastering Basic Knots: The Foundation of Your Bracelet
Knots are the building blocks of your string bracelets. While there are many intricate variations, mastering a few basics will allow you to create a wide variety of designs.
- Overhand Knot: The simplest knot. Used to tie strings together at the start (if not making a loop) and to finish the ends. Simply make a loop and pass the end through it, then tighten.
- Forward Knot (Right-Travelling Knot): This is fundamental for most friendship bracelets. It uses two strands: a working strand (left) and an anchor strand (right).
- Take the left strand and cross it over the right strand, forming a “4” shape.
- Tuck the end of the left strand under the right strand and up through the loop of the “4”.
- Hold the right strand taut and pull the left strand upwards and slightly to the right to tighten the knot at the top.
- Repeat steps 1-3 once more. A complete Forward Knot in friendship bracelets consists of two such movements (or hitches). The working (left) strand has now moved to the right position.
- Backward Knot (Left-Travelling Knot): The mirror image of the forward knot. Uses a working strand (right) and an anchor strand (left).
- Take the right strand and cross it over the left strand, forming a backward “4” or “P” shape.
- Tuck the end of the right strand under the left strand and up through the loop.
- Hold the left strand taut and pull the right strand upwards and slightly to the left to tighten.
- Repeat steps 1-3 once more. A complete Backward Knot also consists of two hitches. The working (right) strand has now moved to the left position.
- Square Knot (Used in Macrame & Closures): This creates a flat, sturdy knot often used for adjustable closures or as the main pattern. It involves four strands (two working outer strands, two core inner strands) or can be adapted for two strands (one core, one working). Using one working strand around a core:
- First Half (Forward Hitch): Make a “4” shape with the working cord over the core cord(s). Pass the end under the core and up through the loop. Tighten.
- Second Half (Backward Hitch): Make a backward “4” or “P” shape with the working cord over the core cord(s). Pass the end under the core and up through the loop. Tighten.
- Repeating these two halves creates a square knot sequence.
- Spiral Knot (Half Square Knot): If you only repeat the first half of the square knot (the “4” shape hitch) over and over, the knot will naturally start to spiral around the core strands.
Note: Friendship bracelet patterns often refer to four knots: Forward (FF), Backward (BB), Forward-Backward (FB), and Backward-Forward (BF). These are combinations of the forward and backward hitches described above, used to control the direction and placement of colours in patterns like chevrons or diamonds.
Your First Project: A Simple Square Knot Bracelet (Adjustable Closure)
This is a great beginner project using a common knot, resulting in a durable and adjustable bracelet.
- Materials: Waxed Cotton or Nylon Cord (approx 1-1.5mm thick), Scissors, Measuring Tape, Tape/Clipboard.
- Measurements:
- Cut 1 piece of cord about 15 inches (38 cm) long. This will be your core strand(s). Fold it in half to create a loop at one end, making two core strands about 7.5 inches long plus the loop.
- Cut 1 piece of cord about 50-60 inches (125-150 cm) long. This is your knotting cord.
- Steps:
-
- Prepare Core: Fold the 15-inch cord in half. Tie a simple overhand knot near the fold to create a small loop (this will be part of the closure).
- Secure: Tape the loop securely to your work surface or clip it to a clipboard. You should have the two core strands hanging down.
- Attach Knotting Cord: Find the center of the long (50-60 inch) knotting cord. Place the center point under the two core strands, just below the starting loop/knot. You’ll have a left working end and a right working end.
- First Square Knot:
- Take the left working end and cross it over the core strands (making a “4” shape).
- Take the right working end and place it over the tail of the left working end.
- Bring the right working end under the core strands and up through the loop of the “4” on the left side.
- Pull both working ends evenly to tighten the knot snugly against the starting loop. This is the first half.
- Now, take the right working end and cross it over the core strands (making a backward “4”).
- Take the left working end and place it over the tail of the right working end.
- Bring the left working end under the core strands and up through the loop on the right side.
- Pull both working ends to tighten. This completes one full square knot.
- Continue Knotting: Repeat Step 4, always starting the “4” shape from the side where the working cord emerges on top from the previous knot. Continue making square knots until the knotted section is almost long enough to go around your wrist (leave about 1-1.5 inches for the closure).
- Finish Bracelet Body: Tie a tight overhand knot using all four strands (two core, two working) right after the last square knot. Trim the two working ends close to this knot. You can add a tiny dab of glue for security if desired. You now have the main bracelet with a loop at one end and two core strands at the other.
- Create Sliding Closure:
- Overlap the loop end and the two loose strands from the other end.
- Take a new piece of cord, about 10 inches (25 cm) long.
- Using this new cord, tie 3-5 full square knots around all the overlapped strands (the loop end counts as strands here). Make sure you can still slide the main bracelet strands through this knotted section.
- Tie off the working ends of this sliding knot section securely (an overhand knot works, or carefully trim and melt if using nylon, or use glue). Trim excess.
- Finish Ends: Tie overhand knots near the very ends of the two loose strands (from the main bracelet body) to act as stoppers. You can add a small bead before the knot if you like. Trim any excess beyond these knots.
- Adjust: Pull the stopper knots to tighten the bracelet, and pull the bracelet sides apart near the sliding knot to loosen.
Related: Ditch the Buckle: Your Ultimate Guide to Crafting a 550 Paracord Bracelet Without Hardware
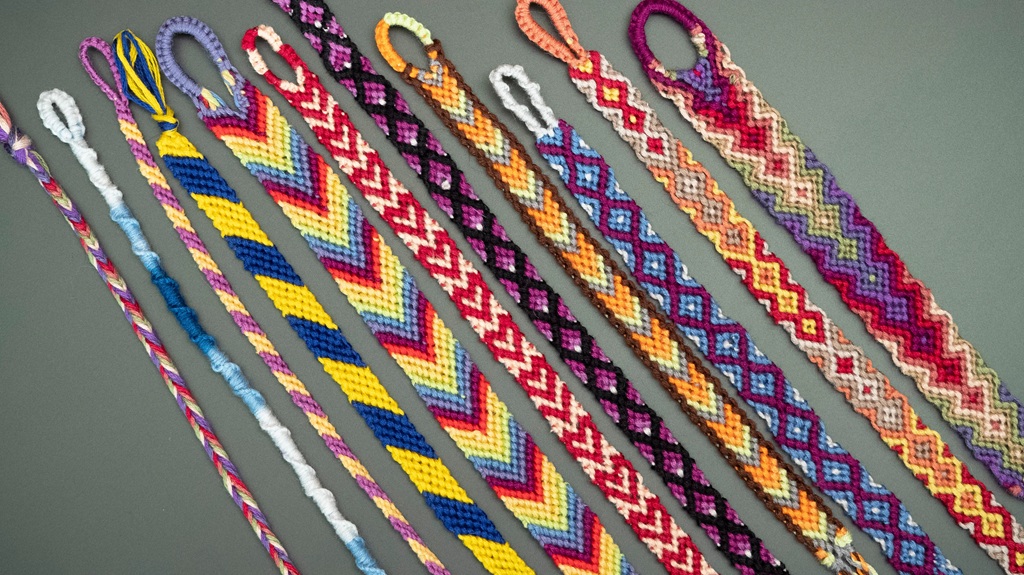
Classic Craft: Making a Candy Stripe Friendship Bracelet
This diagonal stripe pattern is a quintessential friendship bracelet and perfect for mastering the Forward Knot.
- Materials: Embroidery Floss (at least 3-4 different colours), Scissors, Measuring Tape, Tape/Clipboard.
- Measurements: Cut one strand of each colour, approximately 36 inches (90 cm) long. A good rule of thumb is your “wingspan” – the distance from fingertip to fingertip with arms outstretched. For thicker bracelets, use more strands or double up colours.
- Steps:
- Prepare Strands: Gather all strands together. Align the ends and tie an overhand knot about 3 inches (7-8 cm) from one end, creating a tail for tying later. (Alternatively, fold strands in half, tie a knot near the fold to make a loop for starting).
- Secure & Arrange: Tape the knot/loop securely to your surface or clip/pin it. Spread the strands out in the order you want the stripes to appear (e.g., Colour A, B, C, D from left to right).
- First Row (Forward Knots):
- Take the leftmost strand (Colour A). Make a complete Forward Knot (two hitches, remember?) onto the strand immediately to its right (Colour B). Colour A has now moved one position to the right.
- Using the same working strand (Colour A), make a complete Forward Knot onto the next strand to the right (Colour C).
- Continue with Colour A, making Forward Knots on each strand to its right (Colour D), until Colour A is now the rightmost strand. The first diagonal stripe is complete.
- Second Row: The strand that was originally second from the left (Colour B) is now the leftmost strand. Repeat the process: use Colour B to make Forward Knots on every strand to its right (C, D, then A) until Colour B becomes the rightmost strand.
- Continue Pattern: Keep repeating this process, always starting with the new leftmost strand and knotting across all strands to its right. You’ll see the diagonal candy stripes emerge.
- Check Length: Continue knotting until the bracelet is long enough to comfortably fit around your wrist.
- Finish: Once long enough, finish the row you are on. Gather all the strands together and tie a secure overhand knot close to the last row of knots.
- Tidy Ends: You can leave the tails as they are, or divide them into two or three sections and braid them for a neater finish. Tie another overhand knot at the end of the braids and trim any excess string.
- Wear: Tie the bracelet onto your wrist using the starting loop/knot and the braided/knotted ends.
Tips and Tricks for Beautiful Bracelets
- Consistent Tension is Key: This is perhaps the most common challenge for beginners. Try to pull each knot with similar tightness. Too tight can make the bracelet stiff and buckle; too loose creates gaps and an uneven look. Practice will help you find the right feel. Don’t be discouraged if your first few attempts aren’t perfect!
- Neat Starts: The first few rows after a starting knot or loop can sometimes look a bit messy. Keep your tension even, and things usually straighten out as you add more rows. Using a clipboard or firmly taping helps maintain stability.
- Adding Beads: You can easily incorporate beads by sliding them onto the relevant string before you make the knot with it. For larger beads on macrame bracelets, slide them onto the core strands between knots.
- Finishing Flair: Explore different finishing methods beyond simple knots. Braided ends look polished. Button closures (using the starting loop and sewing a button to the other end) are practical. Sliding square knot closures make bracelets adjustable. Crimp ends offer a metallic finish for certain cord types.
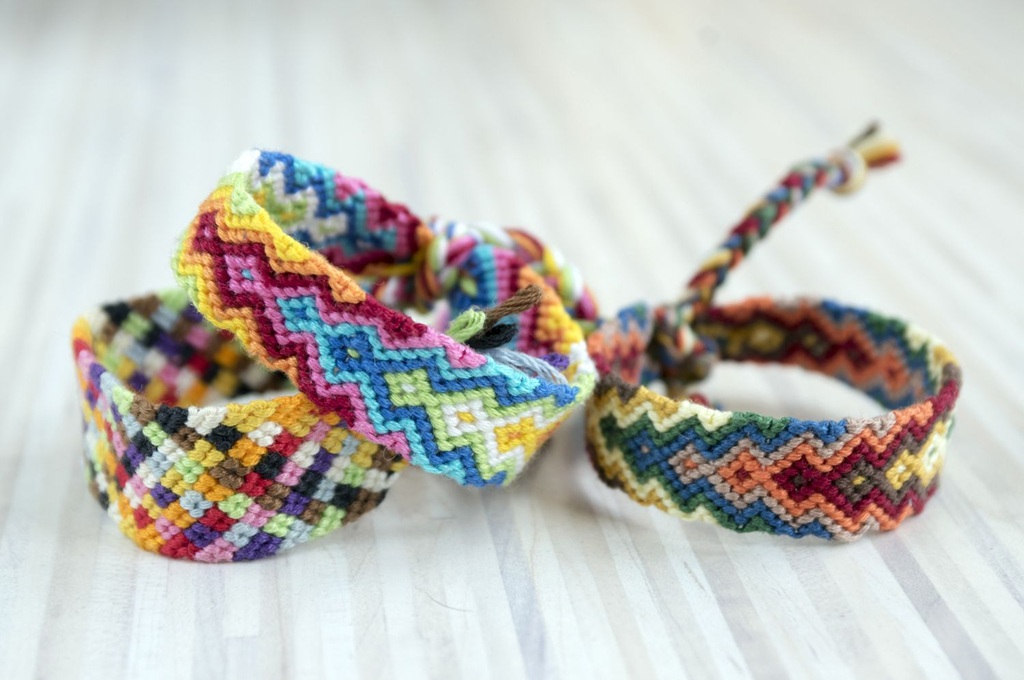
- Colour & Pattern Inspiration: Don’t be afraid to experiment with colour combinations! Look online (Pinterest, BraceletBook.com) for pattern ideas ranging from simple stripes and chevrons to more complex hearts, diamonds, and even names.
- Untying Mistakes: If you make a mistake, use a needle or pin to carefully loosen and undo the incorrect knot(s). It’s easier to fix errors sooner rather than later.
- Practice: Like any craft, the more you practice, the neater and faster your knotting will become. Start simple and gradually challenge yourself with new patterns.
Related: Craft Your Style: A Beginner’s Guide to Making String Bracelets (DIY)
People Also Ask (FAQs)
-
Q1: What’s the best string for friendship bracelets?
- A: Traditional friendship bracelets are most commonly made with 6-strand cotton embroidery floss due to its colour variety, softness, and affordability. However, waxed polyester/cotton cord, pearl cotton, yarn, and thin nylon cords can also be used depending on the desired look and pattern.
-
Q2: How long should the strings be for a bracelet?
- A: It depends on the pattern complexity, string thickness, and wrist size. A general guideline for standard friendship bracelets is 36-40 inches (around 90-100 cm) per strand. More complex patterns or thicker cords might require longer lengths, sometimes up to 72 inches (180 cm), especially if folded to start with a loop. The “wingspan” method (fingertip to fingertip) is a common estimate. It’s usually better to cut slightly longer than too short.
-
Q3: How do you start a string bracelet?
- A: You can either gather all strands, align the ends, and tie a simple overhand knot about 3 inches from the end. Or, for a loop closure, fold all strands in half and tie an overhand knot near the fold, creating a loop.
-
Q4: How do you finish a string bracelet?
- A: The simplest way is to gather the end strands and tie an overhand knot. For a neater look, divide the strands and make two braids, knotting the ends of the braids. For adjustable bracelets, a sliding square knot closure is popular. Clasps can also be attached using jump rings and crimp beads/ends for certain cord types.
-
Q5: Why are my knots uneven or have gaps?
- A: This is almost always due to inconsistent tension when tightening the knots. Try to pull each hitch with the same amount of force. Ensure you’re holding the anchor strand(s) taut while tightening the working strand. Pushing knots up firmly with a fingernail or plastic card can help keep rows even. Practice is the best way to improve consistency.
-
Q6: Can I add beads to my string bracelet?
- A: Absolutely! For friendship bracelets, slide a bead onto the working string before you make a knot with it, or onto multiple strands between knots. For macrame styles, beads are often added to the core strands. You can also add beads or charms to the finishing ties/braids. Ensure the bead hole is large enough for your string.
-
Q7: What are the most important basic knots to learn?
- A: For friendship bracelets, master the Forward Knot and the Backward Knot. For general string bracelets and closures, the Overhand Knot and the Square Knot are essential.
Conclusion: Knot Just a Bracelet, It’s Your Creation!
Making string bracelets is more than just following steps; it’s a journey into colour, texture, and personal style. It’s the satisfaction of mastering a knot, the quiet focus as patterns emerge, and the delight of wearing or gifting something made with your own hands. From the simplest spiral knot to intricate patterned bands, the possibilities are truly endless and limited only by your imagination.
We hope this guide has demystified the process and inspired you to grab some string and start knotting. Don’t worry about perfection initially – embrace the learning process, enjoy the rhythm of the craft, and soon you’ll be creating beautiful, unique string bracelets to wear, share, and cherish. Happy crafting!