How to Make a Rope Ladder: A Step-by-Step Guide
To make a rope ladder, cut planks into rungs and drill holes for the rope to pass through. Use sturdy rope and tie the rungs securely to create a reliable ladder.
You can find detailed step-by-step instructions and video tutorials on websites such as YouTube and DIY Doctor. Additionally, learning different rope tying techniques like the Marlin Spike Hitch and Two Half Hitches can help ensure the ladder’s stability. Experiment with different rope materials and ladder designs to suit your specific needs, whether it’s for a playground, boat, or other purposes.

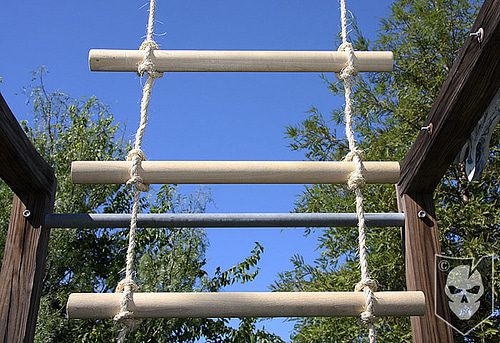
Credit: www.pinterest.com
Materials And Tools Needed
Learn how to make a rope ladder with this easy step-by-step guide. Cut your planks into rungs, mark and drill holes for the rope, and create a sturdy and functional ladder. Perfect for outdoor adventures or DIY projects.
List Of Materials Needed For Making A Rope Ladder
Before you dive into making a rope ladder, it’s essential to gather all the necessary materials. Here’s a list of items you’ll need:
- Rope: Choose a strong rope that can support your weight. Nylon or polypropylene ropes are popular choices.
- Wooden rungs: These will serve as the steps of your ladder. Opt for sturdy and durable wood like oak or ash.
- Drill: A drill will be necessary to create holes in the wooden rungs for the rope to pass through.
- Measuring tape: Use a measuring tape to ensure accurate placement of the rungs on the rope.
- Saw: You’ll need a saw to cut the wooden rungs to your desired length.
- Markers or pencils: These will come in handy when marking the spots where the drill holes will be made.
- Sandpaper: Sandpaper will help smoothen the edges of the wooden rungs for a polished finish.
Essential Tools Required For The Project
In addition to the materials listed above, you’ll also need a set of tools to complete your rope ladder. Here are the essential tools required:
- Hammer: A hammer will be used to secure the rungs in place and ensure they are tightly fixed.
- Scissors or a knife: You’ll need these to cut the rope to the desired length.
- Lighter or matches: A lighter or matches will help seal the cut ends of the rope to prevent fraying.
- Workbench or table: Having a stable surface to work on will make the ladder-making process much easier.
- Protective gear: It’s essential to wear safety goggles and gloves to protect yourself while handling tools and materials.
Now that you have a clear understanding of the materials and tools needed, you’re ready to embark on your rope ladder-making journey. Get your supplies together, find a suitable workspace, and let’s dive right into creating your very own rope ladder!
Measuring And Cutting The Rungs
Learn how to make a rope ladder with this step-by-step guide. Cut your planks into rungs mark up and drill holes for the rope to pass through. Easily create your own rope ladder with these instructions.
Step-by-step Instructions On Measuring And Cutting The Rungs
Measuring and cutting the rungs is a crucial step in making a rope ladder. It determines the overall length and size of the ladder, ensuring stability and safety. Here’s a step-by-step guide on how to measure and cut the rungs:
Tips For Choosing The Right Size And Length
Choosing the right size and length of the rungs is vital for the ladder’s functionality and durability. Here are some tips to help you make the right choices:
- Consider the Purpose: Determine the purpose of the ladder. Whether it’s for recreational use, tree climbing, or even emergency situations, the purpose will dictate the appropriate size and length of the rungs.
- Weight Capacity: Take into account the weight capacity you want the ladder to support. If it’s for adults, ensure the rungs can withstand their weight and provide a stable climbing surface.
- Length: Measure the distance and height at which you intend to use the ladder. This will help you determine how many rungs you’ll need and the overall length of the ladder.
- Rung Thickness: Consider the thickness of the rungs for comfort and grip. Thicker rungs provide a more secure footing while climbing.
- Spacing: Determine the spacing between each rung based on your preference and safety standards. A good rule of thumb is to have around 12 to 18 inches of vertical spacing between each rung.
This section provides a clear and concise guide on measuring and cutting the rungs of a rope ladder. By following these step-by-step instructions and tips, you can create a sturdy and functional ladder that suits your specific needs.
Drilling Holes For The Ropes
To make a rope ladder, start by cutting planks into rungs. Next, mark and drill the holes for the rope to pass through. Finally, tie the rope securely to the rungs, creating a sturdy and functional ladder. With these steps, you’ll have your own rope ladder in no time!
Instructions On Marking And Drilling Holes For The Ropes
To make a sturdy rope ladder, it is essential to properly mark and drill the holes for the ropes. Follow these step-by-step instructions to ensure a successful outcome:
- Start by measuring and marking the desired distance between each rung on your ladder. This will determine the spacing of the holes.
- Using a tape measure or ruler, mark the measurements accurately on both sides of the ladder’s upright supports.
- Choose an appropriate drill bit size for your rope. Typically, a drill bit slightly larger than the diameter of the rope is recommended.
- Secure the ladder uprights in place, either by clamping them or having someone hold them steady.
- Align the drill bit with the marked measurement and carefully drill a hole through both sides of the ladder uprights.
- Repeat this process for each rung, ensuring proper alignment and spacing between the holes.
Tips On Ensuring Proper Alignment And Spacing
Proper alignment and spacing between the holes are crucial for a functional and safe rope ladder. Here are some important tips to ensure you get it right:
- Double-check your measurements before drilling to ensure accuracy.
- Use a straight edge or level to align the marks on both sides of the ladder uprights.
- For consistent spacing between holes, create a template using a spare piece of wood or cardboard with pre-drilled holes.
- Align the template with each mark and use it as a guide for drilling the holes.
- Regularly clean out the drilled holes to remove any debris or wood chips that may interfere with the rope’s insertion.
- Test the rope insertion after drilling each hole to ensure a smooth and secure fit.
By following these instructions and tips, you can create a rope ladder with properly marked and drilled holes. This attention to detail will result in a sturdy and safe ladder that can be enjoyed for various purposes.
Assembling The Rungs And Ropes
Learn how to make a rope ladder with this step-by-step guide. Cut your planks into rungs, mark and drill holes for the rope, and assemble it all together for a sturdy and functional ladder. Watch videos and read tutorials to easily create your own rope ladder.
Step-by-step Guide On Assembling The Ladder With The Rungs And Ropes
Assembling the rungs and ropes is a crucial step in making a rope ladder. By following these step-by-step instructions, you’ll be able to create a sturdy and functional ladder for various purposes. Let’s jump right in:
- Gather your materials: Before starting the assembly process, make sure you have all the necessary materials at hand. These include wooden planks for the rungs, a strong and durable rope, a measuring tape, a drill, and a saw.
- Cut your planks into rungs: Using a saw cut the wooden planks into equally sized rungs. The number of rungs you’ll need depends on how tall you want your ladder to be. Ensure that the rungs are long enough to comfortably step on, but not too wide to impede climbing.
- Mark up and drill the holes for the rope: Lay out the rungs evenly on a flat surface. Measure and mark the points where you want the rope to pass through each rung. Make sure the marks are aligned for consistent spacing. Then, using a drill, carefully create holes at the marked points.
- Thread the rope through the rungs: Take the strong and durable rope you’ve chosen and thread it through the first hole of the bottom rung. Leave a few inches of rope on both ends to secure it later. Continue threading the rope through each rung, making sure they are evenly spaced and aligned.
- Tie knots to secure the rungs: Once the rope is threaded through all the rungs, tie knots at each end of the ladder. You can use a variety of knots to ensure stability and security, such as the double half hitch knot or the square knot. Test the ladder’s stability by gently tugging on each rung to ensure everything is secure.
Tips For Securing The Ropes And Ensuring Stability
Securing the ropes and ensuring stability is crucial for the safety and functionality of your rope ladder. Here are some tips to keep in mind:
- Choose the right type of rope: Opt for a rope that is strong, durable, and appropriate for the intended use of your ladder. Consider factors such as weight capacity and weather resistance.
- Use proper knot techniques: Ensure that you are tying the knots correctly to maximize strength and stability. Practice tying knots before assembling the ladder to perfect your technique.
- Apply glue to the knots: To further secure the knots, you can apply a suitable adhesive or glue. This will provide extra strength and prevent the rope from slipping or coming undone over time.
- Regularly inspect the ladder: After assembling your rope ladder, it’s essential to regularly inspect it for any signs of wear or damage. Check the knots, ropes, and rungs for any fraying, loosening, or weakness. Make any necessary repairs or replacements to maintain the ladder’s stability and safety.
- Consider weight capacity: Before using the ladder, ensure it is capable of supporting the anticipated weight. Keep in mind the weight of the individual or load, as well as any additional factors like equipment or gear that may be carried.
Testing And Safety Precautions
When it comes to making a rope ladder, testing its strength and stability is crucial for ensuring safety. Follow these instructions to test your ladder before use:
Instructions On Testing The Ladder For Strength And Stability
- Inspect the ladder for any signs of wear and tear or damage. Check the ropes, rungs, and knots to make sure they are in good condition.
- Hang the ladder securely using two anchor points, such as sturdy tree branches or a strong support structure.
- Slowly apply your weight to the ladder, starting with just your feet for the initial test. Gradually increase the load as you gain confidence in its stability.
- Pay attention to any signs of strain or weakness in the ladder. Look for excessive bending or stretching of the ropes, and make sure the rungs remain secure.
- If the ladder passes the initial weight test, continue testing with increasing weight until you are confident in its strength and stability.
- Always have a spotter nearby to assist and monitor the testing process.
Testing your rope ladder thoroughly will give you peace of mind when using it for various purposes.
Important Safety Precautions To Follow While Using The Rope Ladder
Safety should always be the top priority when using a rope ladder. Keep the following precautions in mind:
- Always ensure that the ladder is properly secured and anchored before use.
- Check the ladder for any signs of damage or weakness before each use.
- Inspect the anchor points to ensure they are strong and secure.
- Wear appropriate footwear that provides grip and support while climbing.
- Use caution when climbing or descending, maintaining a firm grip on the rungs and holding onto the sides of the ladder.
- Avoid sudden movements or jumping on the ladder to prevent instability.
- Never overload the ladder with excessive weight beyond its recommended capacity.
- Ensure proper lighting and visibility while using the ladder, especially in low-light conditions.
- Keep the ladder away from potential hazards such as electrical wires, sharp objects, or uneven surfaces.
- If using the ladder outdoors, be aware of weather conditions that could impact its stability, such as strong winds or rain.
By following these safety precautions, you can minimize the risks associated with using a rope ladder and ensure a safe and enjoyable climbing experience.
Frequently Asked Questions Of How To Make A Rope Ladder
What Kind Of Rope Do You Use For A Rope Ladder?
For a rope ladder, it is best to use a sturdy and durable rope, such as nylon or polyester. These ropes provide strength and reliability for climbing.
What Is The Best Knot For A Ladder?
The best knot for a ladder is the Two Half Hitches knot. It is ideal for tying ropes to ladder rungs, branches, and other ropes because it forms a tight loop around the object.
How Do You Make A Rope Ladder?
To make a rope ladder, start by cutting your planks into rungs and marking up the holes for the rope. Then, thread the rope through the holes, tying knots at each end of the ladder. Finally, hang the ladder securely and test its stability before use.
What Type Of Rope Should Be Used For A Rope Ladder?
For a rope ladder, it is important to use a strong and durable rope such as nylon or polyester. These materials offer better resistance to wear, weather, and weight, ensuring the ladder is safe and reliable.
Conclusion
Making a rope ladder is a fun and practical project that can come in handy in various situations. By following the step-by-step instructions and utilizing the right materials, you can create a sturdy and reliable ladder. Whether you need it for recreational purposes, such as a playground or boat, or for practical uses like reaching high places, this DIY rope ladder can fulfill your needs.
So gather your materials, get ready to tie some knots, and enjoy the satisfaction of building your very own rope ladder. Start climbing with confidence!