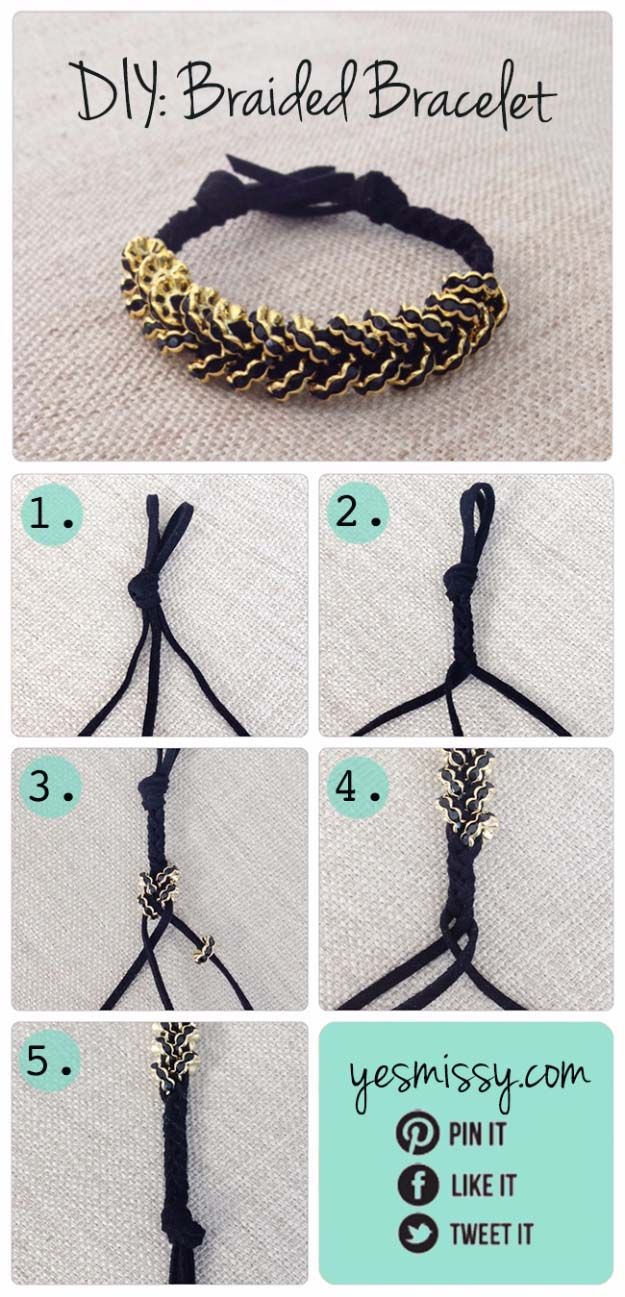
How to Make a Rope Bracelet: Easy DIY Tutorial
To make a rope bracelet, start by choosing your desired length of rope and securing it with a knot. Then, braid the rope while adding beads or charms, and finish by tying off the ends with another knot.
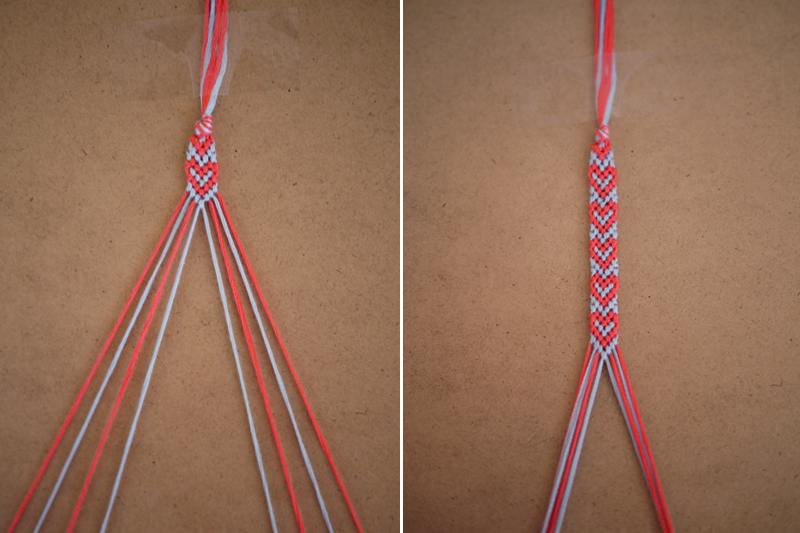
Credit: honestlywtf.com
Step-by-step Instructions
Creating your own rope bracelet can be a fun and rewarding craft project. With just a few simple materials and these easy-to-follow step-by-step instructions, you’ll be able to make your own stylish rope bracelet in no time. Let’s get started!
Choosing The Right Rope
When it comes to making a rope bracelet, choosing the right rope is important for achieving the desired look and durability. Opt for a rope that is strong and sturdy, such as nylon or cotton rope. Consider the thickness of the rope as well, as thicker ropes will create a chunkier and more substantial bracelet. You can find a variety of rope options at your local craft store or online.
Measuring And Cutting The Rope
Before you begin crafting your rope bracelet, measure your wrist to determine the length of the rope needed. To do this, wrap a flexible measuring tape or a piece of string around your wrist, making sure it’s snug but not too tight. Add an extra inch or two to account for the closure and room for a comfortable fit.
- Once you have your measurement, cut the rope to the desired length using sharp scissors or a crafting knife. Make sure to cut the rope as straight as possible to ensure a clean finish.
- If you prefer a layered or braided look, you may cut multiple pieces of rope to the same length.
Adding Closures
The next step is to add closures to your rope bracelet to ensure it stays securely on your wrist.
- If you’re using a simple knot closure, tie a secure knot at each end of the rope.
- For a more decorative closure, you can use jewelry clasps, lobster clasps, or toggle clasps. Simply attach the closure of your choice to each end of the rope using jump rings.
Creating The Bracelet Design
Now it’s time to get creative and design your bracelet. There are endless possibilities when it comes to creating different patterns and designs with rope bracelets.
- To make a basic rope bracelet, you can simply leave the rope as is or experiment with braiding or twisting the ropes together.
- If you want to add some color or texture, consider incorporating beads, charms, or other decorative elements onto the rope.
- You can also mix and match different colors or types of rope to create a unique and personalized bracelet.
Finishing Touches
Once you’re satisfied with the design of your bracelet, it’s time for the finishing touches.
Trim any excess rope if needed, ensuring the ends are neatly finished and secured.
Take a moment to double-check the closures, ensuring they are securely fastened.
Try on your new rope bracelet and make adjustments to ensure a comfortable fit.
Now that you have completed the step-by-step process, you can proudly wear your handmade rope bracelet or give it as a thoughtful and personalized gift to someone special. Happy crafting!
Pinky Promise Matching Bracelet for Couple

Distance Relationship Gifts for Women Men
Product details:
Material: Wax Coated Rope, Seed Beads
Metal Type: No Metal Type
Clasp Type: No clasp type
Chain Type: Rope Chain
About this item
Promise Bracelets for Couples — Distance bracelets allow you to feel close to your loved one, no matter the distance. Feeling together no matter where you are & no matter how far with you, I promise to wear this matching bracelet and remember how lucky I am to have you. This is our pinky promise.
Long Distance Bracelets — A great way to show your love and your friendship. Keep one for yourself and give the other to your best friend, sister, brother, mom, dad, or lover, or keep them both for yourself!
Material & Size — This bracelet is made from sturdy rope, comfortable to wear. The max length is 10.5″, no worries about size, simply pull the strings to tighten or loosen the bracelet for a perfect fit.
Perfect Couples Gifts — This is a meaningful gift to show your love for someone special. Great Choice for Graduation, Christmas, Anniversary, Valentine’s Day, Birthday, Mother’s Day, Thanksgiving Day, or Romantic Surprises.

Credit: www.pinterest.com
Variations And Customizations
Learn how to create a personalized rope bracelet with our step-by-step guide. Discover variations and customizations to make your bracelet unique.
When it comes to making rope bracelets, the possibilities for variations and customizations are endless. Adding your personal touch to a bracelet not only makes it unique but also allows you to showcase your creative flair. Whether you want to add beads or charms, experiment with different knot techniques, or use multiple colors or types of rope, the options are plentiful.
Adding Beads Or Charms
One way to elevate the style of your rope bracelet is by incorporating beads or charms. These tiny embellishments can add a pop of color, sparkle, or even a meaningful symbol to your bracelet. To incorporate beads or charms into your design, follow these simple steps:
- Select the desired beads or charms that are compatible with your rope size.
- Thread the beads or charms onto the rope before you start the bracelet-making process.
- Continue making the bracelet as usual, ensuring that the beads or charms are evenly spaced throughout the design.
- Secure the ends of the rope, making sure the beads or charms are held securely in place.
Experimenting With Different Knot Techniques
Knot techniques can greatly impact the overall appearance of your rope bracelet. By experimenting with various knotting methods, you can create different patterns and textures, giving your bracelet a unique look. Here are a few knot techniques you can try:
- Double knot: The simplest and most common knot technique, involving crossing the ends of the rope and pulling them through the loop.
- Square knot: A versatile knot that forms a square shape, created by alternating a left-over-right and right-over-left sequence.
- Sliding knot: An adjustable knot that allows you to easily tighten or loosen the bracelet, making it suitable for all wrist sizes.
- Half-hitch knot: A basic decorative knot formed by tying a simple overhand knot and repeating it until the desired length is achieved.
Using Multiple Colors Or Types Of Rope
Why stick to one color or type of rope when you can combine different shades or materials for a visually captivating rope bracelet? Mixing colors can create a vibrant and eye-catching accessory, while incorporating different rope types can add texture and depth. Here are some ways to incorporate multiple colors or types of rope:
- Select two or three complementary or contrasting colors of rope.
- Begin by creating a base with one color and then introduce the other colors as you proceed with the bracelet-making process.
- For a unique twist, use ropes of varying thicknesses or materials, such as nylon, leather, or suede.
- Experiment with different braiding or weaving techniques to showcase the distinctiveness of each rope.
Adjustable Rope Couples Bracelets

Anniversary Valentine’s Day Birthday Christmas Gift for Him and Her
Product details:
Material: Stainless Steel
Metal Type: Stainless Steel
Clasp Type: Lobster Claw
Chain Type: Braided Chain
Gem Type: No gemstone
Item Type name: Link Bracelets

Credit: www.cutoutandkeep.net
Frequently Asked Questions Of How To Make A Rope Bracelet
How Do You Make A Rope Bracelet?
To make a rope bracelet, start by selecting a rope with the desired thickness and color. Cut the rope to the desired length and seal the ends to prevent fraying. Then, create a loop at one end of the rope and secure it with a knot.
Finally, wrap the rope around your wrist and secure the other end with a knot or a clasp.
What Materials Do You Need To Make A Rope Bracelet?
To make a rope bracelet, you will need a rope of your choice, scissors, a lighter or a clear nail polish to seal the ends, and a closure option such as a knot or a clasp. Be sure to choose a rope that is durable and suitable for jewelry making.
What Are The Different Types Of Rope Bracelets?
There are various types of rope bracelets that you can make, such as braided rope bracelets, charm rope bracelets, adjustable rope bracelets, and beaded rope bracelets. Each type offers a unique style and can be customized to suit your preferences.
Experiment with different techniques and designs to create your own unique rope bracelet.
Conclusion
Making a rope bracelet is a fun and creative craft project that allows you to showcase your personal style. By following these simple steps, you can create a unique accessory that adds a fashionable touch to any outfit. Whether you’re a beginner or an experienced DIY enthusiast, this easy-to-follow guide provides all the information you need to get started.
So grab your ropes, beading materials, and let your imagination run wild as you create your own stunning rope bracelets! Happy crafting!