How To Tie Boat Anchor Ropes: Secure Knots, Chain Connections, and Safe Setup
Learning how to tie boat anchor ropes correctly starts with the right knot and attachment point. For most recreational boats, an anchor bend provides a dependable connection between rope and anchor hardware. A proper setup also uses chain near the anchor and sufficient scope for reliable holding. Quality Boat anchor ropes can improve handling and reduce shock loads. Two wraps around the attachment point create better friction than one wrap. Meanwhile, a 5:1 scope provides a useful minimum starting point for many anchoring situations.
Key Takeaways
- Use an anchor bend to connect rope with an anchor shackle or eye.
- Wrap the rope twice around the anchor attachment before finishing the knot.
- Add a chain leader to improve abrasion resistance and anchor performance.
- Secure the boat end with a proper cleat hitch or suitable permanent connection.
- Inspect every knot, shackle, splice, and rope section before anchoring.
- Increase scope when wind, waves, current, or bottom conditions demand it.
Understand the Complete Anchor Rode Before Tying
Before tying anything, identify every part connecting your boat to the seabed. The complete system is called the anchor rode. It commonly includes the anchor, shackle, chain, rope, and boat attachment point.
Each component handles a different job during anchoring. The anchor grips the bottom, while chain helps keep the pull angle low. The rope adds length and useful elasticity, while the boat fitting transfers load into the hull.
Therefore, tying the rope correctly represents only one part of reliable anchoring. A perfect knot cannot compensate for damaged rope, undersized hardware, or inadequate scope.
Choose the Right Knot for the Anchor End
Why the Anchor Bend Works Well
The anchor bend, also called an anchor hitch, suits many rope-to-anchor connections. It grips the attachment point securely while remaining practical for routine boating.
Unlike a simple overhand knot, the anchor bend handles repeated loading more effectively. It also works particularly well around shackles, rings, and anchor eyes.
However, knot performance depends on correct dressing and sufficient rope tail. A poorly formed knot can loosen, jam, or reduce confidence during retrieval.
When a Bowline Makes More Sense
A bowline creates a fixed loop and offers an easy release after loading. It can suit specific rigging situations where a permanent loop provides practical benefits.
Still, do not automatically substitute a bowline for an anchor bend. Choose the connection according to your anchor hardware and manufacturer recommendations.
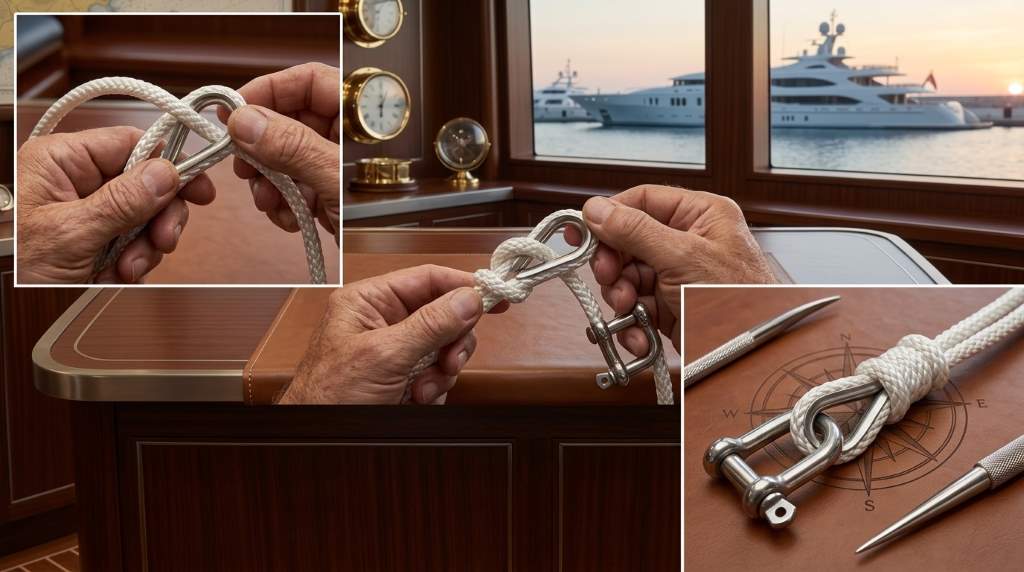
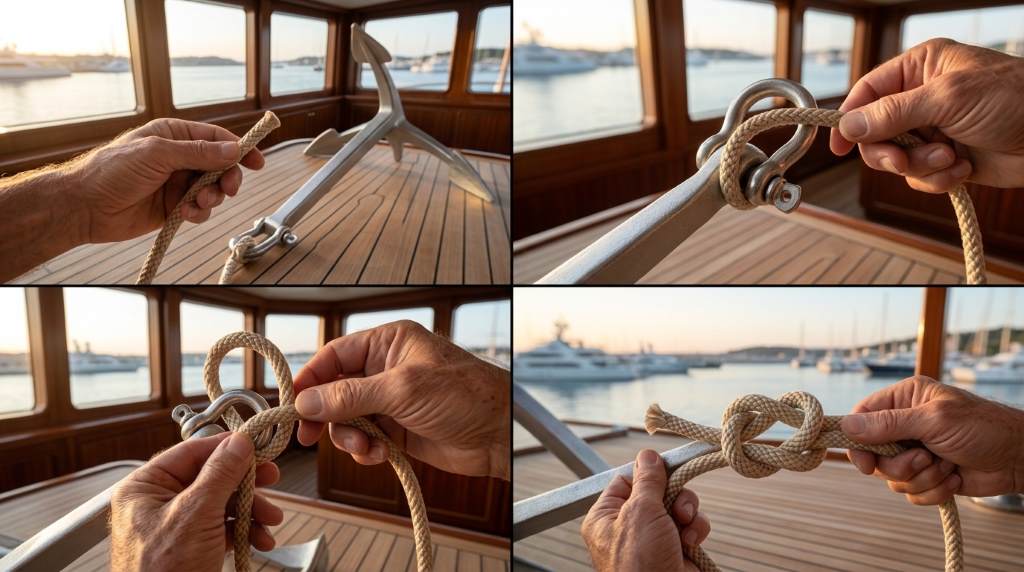
How To Tie an Anchor Bend Step by Step
Start by inspecting the rope end and anchor attachment point. Remove damaged fibers and confirm that the shackle pin fits securely.
- Pass the working end through the anchor shackle or anchor eye.
- Wrap the working end around the attachment point for a second pass.
- Bring the working end across the standing part of the rope.
- Pass the working end through the loops created around the hardware.
- Pull the standing part and working end to seat the knot firmly.
- Make a finishing half hitch around the standing line.
- Add another half hitch when enough tail remains for a secure finish.
- Dress the knot neatly and remove unnecessary slack from every turn.
The finished knot should sit tightly against the shackle without crossing strands unnecessarily. Keep a sufficient tail beyond the finishing hitch for additional security.
Next, load the connection gradually by hand before placing it under real anchoring tension. This check helps reveal loose turns, poor dressing, or unexpected movement.
Connect Rope to Anchor Chain Correctly
Many recreational anchoring systems combine nylon rope with a short length of chain. This combination provides useful weight, abrasion resistance, and shock management near the anchor.
Attach the chain to the anchor using a properly sized marine shackle. Then connect the rope to the opposite chain end using suitable hardware or a properly executed splice.
For permanent setups, a rope-to-chain splice can provide a clean connection through compatible hardware. For field repairs, an appropriate knot may provide a practical temporary solution.
Always verify compatibility between rope diameter, chain size, shackle strength, and anchor hardware. The weakest component can determine the safety of the entire rode.
Why Chain Placement Matters
Chain adds weight close to the anchor and helps keep the rode closer to the seabed. It also protects rope against abrasion from rocks, shells, and other bottom hazards.
Furthermore, chain can reduce sudden upward loading on the anchor. That advantage becomes especially useful when wind or waves repeatedly change the rode tension.
Secure the Boat End of the Anchor Rope
The anchor end and boat end require different attachment methods. Confusing these connections can create unnecessary risk during anchoring.
At the boat, lead the rode through a strong bow fitting or suitable anchor roller. Then secure the line to a properly rated cleat or anchoring point.
Using a Cleat Hitch
A cleat hitch works well when you need a removable connection at a deck cleat. First, take the line around the base of the cleat.
Next, make several turns around the cleat before finishing with crossed turns. Finish with a locking turn that allows controlled release later.
Keep the turns neat and avoid stacking unnecessary rope over the cleat. A clean hitch makes inspection and release considerably easier.
Never Tie to a Weak Fitting
Do not attach an anchor rode to a decorative rail, lightweight handle, or unsuitable eye. Anchoring loads can become substantial when wind and waves increase.
Instead, use a fitting designed to handle anchoring loads. Follow the boat manufacturer’s guidance when selecting the attachment point.
Calculate Anchor Scope Before You Drop the Anchor
Correct knot tying cannot overcome insufficient rode length. Scope describes the ratio between deployed rode and the vertical distance from the bow to the seabed.
For example, a 5:1 scope means five feet of rode for each foot of vertical distance. However, stronger conditions can require more scope, depending on your anchor and surroundings.
Remember to include bow height when estimating the vertical distance. Water depth alone can produce an inaccurate scope calculation.
For example, 20 feet of water with a four-foot bow height creates 24 feet vertically. At 7:1 scope, that requires approximately 168 feet of deployed rode.
Always consider the anchor manufacturer’s guidance before relying on a fixed scope number. Wind, current, waves, bottom type, and available swing room also affect the decision.
Use the Right Rope for Your Anchoring Conditions
Nylon remains popular for recreational anchor rodes because it combines strength with useful elasticity. That elasticity can absorb some shock created by vessel movement.
Three-strand nylon also offers practical handling and relatively straightforward splicing. Double-braid nylon provides a different balance of strength, handling, and construction.
Choose rope diameter according to your boat, anchor, hardware, and operating conditions. Avoid selecting rope solely because it feels thick or looks strong.
Oversized rope can become difficult to handle and may not work properly with certain windlasses. Undersized rope can create an avoidable weak point during heavy loading.
Inspect the Rope Before Every Anchoring Trip
Inspection should happen before the boat leaves the dock. A few minutes of checking can expose problems before the rope experiences serious tension.
- Look for fuzzy sections, cuts, flattened areas, and severe discoloration.
- Check the rope end for unraveling or damaged strands.
- Inspect shackles for distortion, corrosion, or damaged threads.
- Confirm that shackle pins remain fully engaged.
- Check chain links for excessive wear, cracks, or sharp edges.
- Inspect the anchor bend for proper dressing and tightness.
- Examine the cleat connection for movement or unusual loading.
Replace rope when damage compromises its structure rather than waiting for complete failure. Salt, ultraviolet exposure, abrasion, and repeated loading can gradually weaken marine rope.
Common Boat Anchor Rope Tying Mistakes
Using Only One Wrap
A single wrap around the anchor hardware provides less friction than a properly dressed double wrap. Therefore, use the recommended anchor bend configuration instead.
Leaving Too Little Tail
A short tail gives the finishing knot less security. Leave enough tail for a proper finishing hitch and future inspection.
Ignoring Rope Chafe
Rope can suffer serious abrasion where it contacts chain, fittings, rollers, or rough surfaces. Inspect these contact points especially carefully after repeated anchoring.
Using an Unrated Clip
Convenient clips do not automatically provide adequate strength for anchoring loads. Use marine-grade hardware with suitable working and breaking strength.
Forgetting the Boat End
Some boaters focus entirely on the anchor connection and overlook the bow attachment. However, the boat-end connection must handle the same overall system loads.
How To Test Your Anchor Rope Connection
Test the connection before relying on it offshore or overnight. Start with a visual inspection, then apply gradual hand tension.
Next, confirm that the knot remains seated against the hardware. Check that the rope tail stays secure and that no strand crosses incorrectly.
After anchoring, monitor the boat’s position relative to fixed landmarks. Unexpected movement can indicate dragging, insufficient scope, changing conditions, or bottom limitations.
If the anchor drags, do not simply add another knot. Reassess scope, anchor position, bottom conditions, rode configuration, and weather.
How To Retrieve an Anchor Without Damaging the Rope
Retrieve the rode steadily rather than pulling aggressively against a buried anchor. Keep the line organized so it does not create dangerous coils around feet or equipment.
As the boat moves toward the anchor, reduce unnecessary side loading on the rope. Maintain awareness of the chain and anchor position throughout retrieval.
Once the anchor reaches the boat, rinse salt and sediment from the rope when practical. Then allow the rope to dry before storing it in a ventilated location.
When an Anchor Bridle Can Improve the Setup
An anchor bridle can distribute loads and change the rode’s attachment geometry. It can also reduce strain transmitted directly through a single bow point.
Bridles become particularly useful on boats with suitable attachment points and anchoring arrangements. However, they require correct sizing, connection methods, and clearance.
Do not improvise a bridle from unsuitable rope or hardware. Every component should match the expected loads and marine environment.
A Practical Pre-Anchor Checklist
| Check | What to Confirm |
|---|---|
| Anchor | Correct type, size, and condition for the intended bottom |
| Shackle | Proper size, secure pin, and no serious corrosion |
| Chain | Correct length, condition, and compatible connection |
| Rope | Suitable diameter, construction, length, and condition |
| Anchor bend | Two wraps, proper dressing, secure finishing hitch |
| Boat fitting | Strong attachment point designed for anchoring loads |
| Scope | Enough deployed rode for depth and current conditions |
What To Do If Your Anchor Rope Slips
If the knot slips during inspection, stop using that connection immediately. Untie it completely and inspect the rope for damage or glazing.
Then retie the correct knot with clean, properly dressed turns. If the rope repeatedly slips despite correct technique, replace it or reassess compatibility.
Never compensate for questionable rope with excessive knots or improvised hardware. A reliable anchoring system depends on compatible components working together.
Final Tips for Safer Anchor Rope Tying
Practice the anchor bend on dry land before using it around moving water. Familiarity helps you create consistent knots without rushing during real anchoring.
Also practice identifying the standing part, working end, chain, shackle, and boat attachment point. Clear terminology makes troubleshooting easier when conditions become stressful.
Most importantly, inspect the entire rode rather than focusing only on the knot. Safe anchoring depends on the combined condition of every connection and component.
Conclusion
The best way to tie a boat anchor rope is to use a properly dressed anchor bend at the anchor connection. Combine that knot with suitable chain, strong hardware, adequate scope, and a secure boat attachment.
Before your next trip, practice the knot and inspect your entire rode from anchor to cleat. Replace questionable components before they fail, and always adjust your anchoring setup for actual conditions.
Use this guide as a practical checklist, then follow your boat and anchor manufacturer’s specific recommendations. A few careful minutes before anchoring can protect your equipment and improve your confidence on the water.
Frequently Asked Questions
What knot is best for tying rope to a boat anchor?
The anchor bend is a reliable choice for connecting suitable rope to an anchor shackle or eye.
Should anchor rope connect directly to the anchor?
Many recreational setups use rope connected through a chain leader for better abrasion protection and anchor performance.
How many times should you wrap anchor rope around a shackle?
Two wraps provide better friction and security than a single wrap for a properly tied anchor bend.
Can you use a bowline for an anchor rope?
A bowline can suit certain applications, but the anchor bend commonly provides a better hardware connection.
How much anchor rope should I let out?
Use the anchor manufacturer’s guidance while considering depth, bow height, wind, current, waves, and available swing room.